Saturday 20 April 2013

Maintain Inventory Items


Maintain Inventory Items
When we maintain the inventory items we open the peach tree software and click the maintain option then following window will appear.


When we click the inventory item option then following window will appear.

This window shows the different options and different main tabs options. General, custom fields, history options will appear and other two options bill of materials and attributes are shows according to the item class option.

Header Fields of Maintain Inventory Items:


This window shows these options item ID description item class inactive and subject to commission. We can enter these options in this window.
Item ID: To enter the item ID.
Description: To enter the description.
Item Class: Select the item class in these options.

General:


General tab shows the different options.
Price Level: Select the price level in 10 options according to their specification.
Last Unit Cost: Select the last unit cost.
Cost Method: Select the cost method in three options FIFO, LIFO and Weighted Average.
GL Sales Acct: To enter the general ledger sales account.
GL Inventory Acct: To enter the general ledger inventory account.
GL Cost of Sales Acct: To enter the general ledger cost of sales account.
Item Type: To enter the item type.
Location: To enter the location in the store room.
Units/Measure: To enter the unit/measure.
Weight: To enter the weight according to the items.
Minimum Stock: To enter the minimum stock according to their minimum inventory level.
Reorder Quantity: To enter the reorder quantity level.

Custom Field:

Custom fields show the different option which can be change according to their specification. Field labels can be changed and/or enable on the item default window.

History:


History show the information Period history, Unit Sold, Sales, Unit Rec‘d and Costs.


Wednesday 10 April 2013

How to Maintain Vendor


How to Maintain Vendor
First of all we open the peach tree software and go to main menu option maintain then click the maintain option and select the vendor option.

When we click the vendor option then following window will appear.

Ø  Name and address information of the vendor including city’s Zip country vendor type mailing address, phone, fax, e-mail, and web site address.
Ø  Balance with this vendor purchase defaults
Ø  Custom fields
Ø  History
Ø  Type of 1099
Header Fields of vendor

Header fields are located above the main folder tabs. This window shows the vendor ID name and inactive options.
Vendor ID
Vendor ID means a specific code which has been entered in this box. It includes alphabets and numbers.
Name
Enter the name of vendor these name which are entered in this box it can be company name or an individual’s.
Inactive
When you close the fiscal year check the inactive box.
General:

To enter the general information of vendor such as contact, account number, address, city, country, vendor type, Telephone, fax, e-mail and web site.
Purchase Defaults:

 Purchase Rep: We can select any employee
Purchase Acct: To enter the purchase accounts this vendor.
Tax ID: Enter the tax ID number in this box.
Ship Via: Select the ship via in this option which is incurred in this window.
Term: Define the terms which are given in this window.
Custom Fields:

Select the custom fields tab in the maintain window and enter the custom field information for the select vendor record.


History:

When we click the history option then following window will appear.
Vendor Since: To enter the date in vendor since.
Last Invoice Date: Enter the last date of invoice which is received from vendor.
Last Invoice Amount: To enter the amount of last invoice.
Last Payment Date: To enter the last payment date you paid the vendor.
Last Payment Amount: To enter the last amount you paid the vendor.


Sunday 7 April 2013

Default information


Default information
After maintain customer/prospects then we change the default information.
We click the maintain option and go to default information and sub head of customer option.


Payment term:
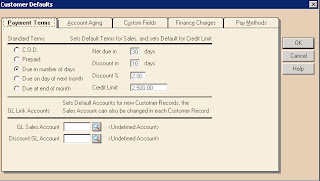
When we click the customers’ option then following window will appear.

We use the payment term options for example due in number of days.
When we select the option due in number of days then these option are appear which can be change.
Net due in 30 days we can change these days more than 30 days are less than 30 days.
Discount in 10 days we can change these days.
Discount in percentage for example 2% when payment made by 10 days.
Credit limit are defined which can be change according to their customers.

Accounting Aging:

Accounting aging defines the different options. Two boxes are shown 1st box age invoice by and second are aging categories.
Invoice date
Due date
1st column number of days and column heading and the four columns are shown and different number of days and column heading are shown according their columns.

Custom Fields

Custom fields shown the 5 field tab options and provide the option of enabled. These field tabs are change according to their specification. Custom fields can be used to extra information about customers.

Finance Charges:

When we click the finance charges options then following window will appear and shows the different options which are written and change their specification.

Pay Methods:

When we click the pay methods option then following window will appear this window shows the different payment methods option 1st column shown the field option and second column shown the payment methods.
Payment made by cash, check, visa, MasterCard, Amex and discover.


Thursday 4 April 2013

Maintain customers/prospects


Maintain customers/prospects

We use peach tree software to maintain customers/prospects. When we click the maintain option then following window will appears.


This window shows the different options when we click the customers/prospects option then following window will appears.


Header Fields:
This window shows the different options main bar which shows the close, save, delete etc options.


This window shows the different options for example customers ID, name, prospect and inactive. We enter the customers ID, name and also use the prospect and inactive option.

General Tab:


 When we click the general tab options then following window will appear and different options for example contact address customers type etc.
We enter the following information according to their options Contact, Address, City, ST Zip then Country, Sales Tax, Customers Type, Telephone 1 Telephone 2, Fax E-mail, Web Site.

Beginning Balances:
When we click the beginning balance option then following window will appear.


 In this window enter the invoice number date purchase order number are not necessary and also enter the amount and A/R account.

We click the customer balance option then following window will appear.


 This window shows the customer ID name and the balance amount and also shows the beginning account receivable balance.


Sales Defaults Tab:
When we click the Sales Defaults option then these options are given for example Sales Rep, GL Sales Acct, Open P.O. # Ship via, Resale #, Pricing Level.

In this option general ledger sales account are very important because this account shows the effect of this account.
Pricing level shows the different option pricing level 1 to pricing level 10 this pricing level shows the different prices.


We can change the term by using the term arrow option then following window will appear.


 We can change the amount of net due in discount in discount % credit limit.


Payment Defaults Tab:
After sales defaults tab then click the Payments Defaults option. When we click the Payment Defaults options then following options are given.


We enter the information according to their options Cardholders name address city state zip country credit card number expiration date.
We use the payment method option and cash account option. 

Custom Fields Tab:
We click the custom fields tab then following window will appear.

 This window shows the different options for example second contact, reference, mailing list and multiple sites. These options are change to another account.


History Tab:
We click the history option then following window will appear.


This window shows the different options for example customer since, last invoice date, and also given the                columns of period history, sales and cash.